The box arrived and I immediately appreciated that this isn't one of those kits where you get three clusters and a prayer. 640 pieces across four densities — 30D, 40D, 50D, and 60D — plus bond, seal, tweezers, and a brush. For $9.99, I was half expecting corners to be cut somewhere. What I actually got was a kit that solves the biggest frustration I had with lash clusters: variety. My outer corners want 60D drama, my inner corners want 30D subtlety, and this kit actually lets me do both without buying four separate packs.
I've gone through so many lash cluster kits I've lost count. Some had great lashes but terrible glue. Some had decent glue but the clusters themselves were stiff and refused to follow my eye curve. I ordered this one because the multi-density range caught my attention — most budget kits give you one density and call it a day. What showed up changed my at-home lash game more than I expected.
Do Lash Clusters Actually Stay On for a Full Week?

This is the question every cluster user asks, and I finally have an answer that isn't just "it depends on your glue." The bond in this OLLAVO kit is solid, but the real secret to longevity is technique. I learned the hard way that you cannot apply bond like mascara — if you coat your entire lash from base to tip, the ends get clumpy and that's exactly when clusters start falling out. The right approach is bond only on the base of your natural lash, then a tiny dab on the top band of each cluster. Look down into a mirror, not straight ahead, and apply.
Here's the routine that finally got me seven days of wear: clean bare lashes thoroughly first — any residual oil or makeup is the enemy. Curl your natural lashes beforehand if they're flat or downturned. Apply bond sparingly to the base only. Place clusters overlapping slightly in a clean line. Wait five full minutes without touching them. Then clamp clusters into your natural lashes with tweezers or fingers. Seal the band. Do not get them wet for 12 hours. I've sweated through workouts, sat in a sauna, and washed my face carefully — this method kept them anchored.
The glue did start thickening around the third use, which is normal. I eventually switched to a separate bond I already had on hand, but the included bond is perfectly serviceable for getting started. One thing I noticed: the thin band on these clusters is a genuine advantage. Thick bands always felt like I had something sitting on my lash line. These sit close and I forget I'm wearing them.
Are Clusters Damaging to Natural Lashes?
I asked myself this constantly when I first started. Two years into wearing clusters regularly, I can tell you the damage narrative is real — but it's about wear time and removal, not the clusters themselves. A lash tech explained it to me once, and it finally clicked: your natural lashes grow in three different cycles. Some are mature and ready to shed, others are brand new. When you bond a cluster across several lashes, you're locking lashes at different stages together. For a few days, that's fine. Wear them past five or six days, and a mature lash trying to naturally shed is now tugging on immature lashes that aren't ready to go. That's where damage happens.
I wear my clusters for four to five days max, then remove them gently with an oil-based cleanser — none of that peel-and-rip business that social media normalizes. Let the remover sit on the band for 30 seconds, and the clusters slide off without pulling. My natural lashes are healthier now than when I was wearing waterproof mascara daily and scrubbing it off every night. Castor oil on a spoolie before bed helps too, especially if you're recovering from a bad removal or giving your lashes a break between applications.
The 30D clusters in this kit are light enough that I never feel like they're weighing down my inner lashes. The 60D ones at the outer corners give volume without making my lash line feel heavy. Keeping the inner and outer corners free of clusters — leaving a few natural lashes exposed — also helps avoid that poking sensation that drives people crazy. If you feel something jabbing your eye, it's almost always because a cluster crept too close to the pink space near your tear duct.
Is the Learning Curve Worth It for Beginners?
My first attempt at cluster lashes took 45 minutes and looked lopsided. The left eye was round and fluttery, the right eye somehow ended up spiky and uneven. Same lash map, completely different results. I've now done this over a hundred times, and here's what nobody tells you: your eyes are not symmetrical. The same map doesn't always produce the same look. You have to adjust — slightly shorter clusters on one side, a touch more overlap on the other.
A 30x magnifying mirror on a stand was the single biggest upgrade to my application. Not a handheld mirror, not the bathroom vanity — a stand mirror you can position low so you're looking down into it. This angle exposes your lash line better than anything else. Beyond that: keep a cotton pad with a bit of oil cleanser nearby and wipe your tweezers on it between each cluster application. Sticky tweezers that grab the cluster you're trying to place are maddening, and this tiny step eliminates it completely.
The OLLAVO kit is surprisingly beginner-friendly because of the density range. Start with 30D clusters — they're lighter, thinner, and more forgiving of imperfect placement. Once you're comfortable, mix in 40D and 50D for texture. Save the 60Ds for the outer corners once you've got the basics down. At 640 pieces and $9.99, you can afford to practice, mess up, redo, and still have more clusters left than you know what to do with. That low stakes factor genuinely makes learning less frustrating.
Pros, Cons, and Verdict
What I love: The density variety is unmatched at this price. Thin, transparent bands that disappear against the lash line. Lightweight feel — I genuinely forget I'm wearing them. The 9-16mm range covers everything from natural to dramatic. 640 pieces means months of wear from a single kit. The included bond works, and the tweezers are actually usable (not the usual throwaway junk).
What could be better: The bond thickens after a few uses — budget for a replacement if you do lashes frequently. No removal product included, which is a missed opportunity for a "complete" kit. The 60D clusters can look a bit uniform if you don't break them up with lighter densities in the middle. And if you're someone who wants pre-glued clusters you can just press on, this isn't that — you're working with bond and seal, which takes technique.
For $9.99, the OLLAVO 640pc kit over-delivers. You get four distinct densities in one package, the bands are thin and comfortable, and the 9-16mm length range lets you build a genuinely custom lash map. Compared to the MOONKALI Wispy Clusters which are excellent for manga-style looks, this OLLAVO kit is more versatile for everyday wear across different styles. If you've been buying single-density cluster packs and feeling like something's missing, this is the fix. If you're brand new to cluster lashes, the sheer quantity gives you room to learn without burning through expensive product. Just respect the wear time, remove them gently, and your natural lashes will stay healthy underneath.
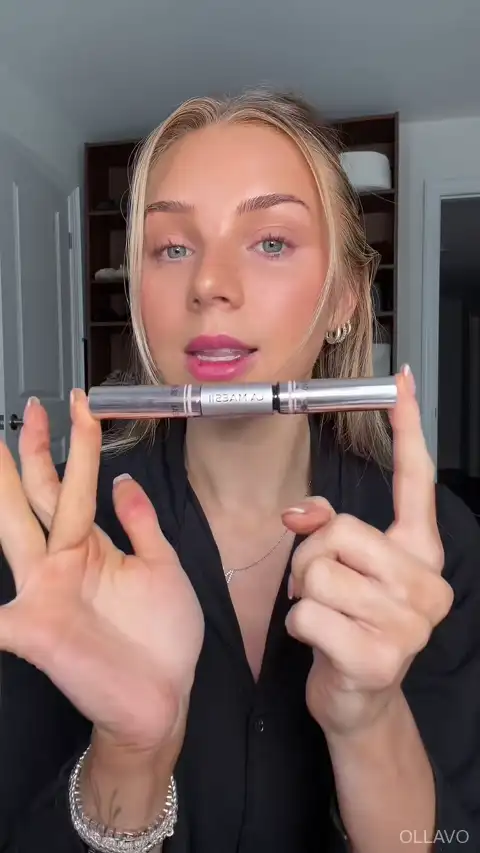
OLLAVO 640pc Lash Clusters Kit — 30D-60D D-Curl
Four-density DIY lash extension kit with thin bands, bond, seal, and tools — $9.99.
View Product — $9.99| Product Specs | |
|---|---|
| Brand | OLLAVO |
| Pieces | 640 clusters |
| Densities | 30D, 40D, 50D, 60D |
| Curl | D Curl |
| Length | 9-16mm mixed |
| Band | Thin transparent |
| Includes | Bond, seal, tweezers, applicator brush |
| Style | Fluffy wispy |